> ## Documentation Index
> Fetch the complete documentation index at: https://cal.id/docs/llms.txt
> Use this file to discover all available pages before exploring further.
# Setting Up Google Analytics & Tag Manager
> Track visitor behavior and booking conversions on your Cal ID pages by connecting Google Analytics 4 and Google Tag Manager to your account.
Integrating Google Analytics (GA) and Google Tag Manager (GTM) allows you to track visitor behavior on your booking pages, measure conversion rates, and analyze the effectiveness of your marketing campaigns.
Before you start, have your tracking ID ready — a Google Analytics **Measurement ID** (`G-XXXXXXX`, or a legacy `UA-XXXXXX-Y`) or a Google Tag Manager **container ID** (`GTM-XXXXXX`). You'll paste it into Cal ID during setup.
## Accessing the app store
Open your main dashboard at [Cal ID](https://cal.id/home).
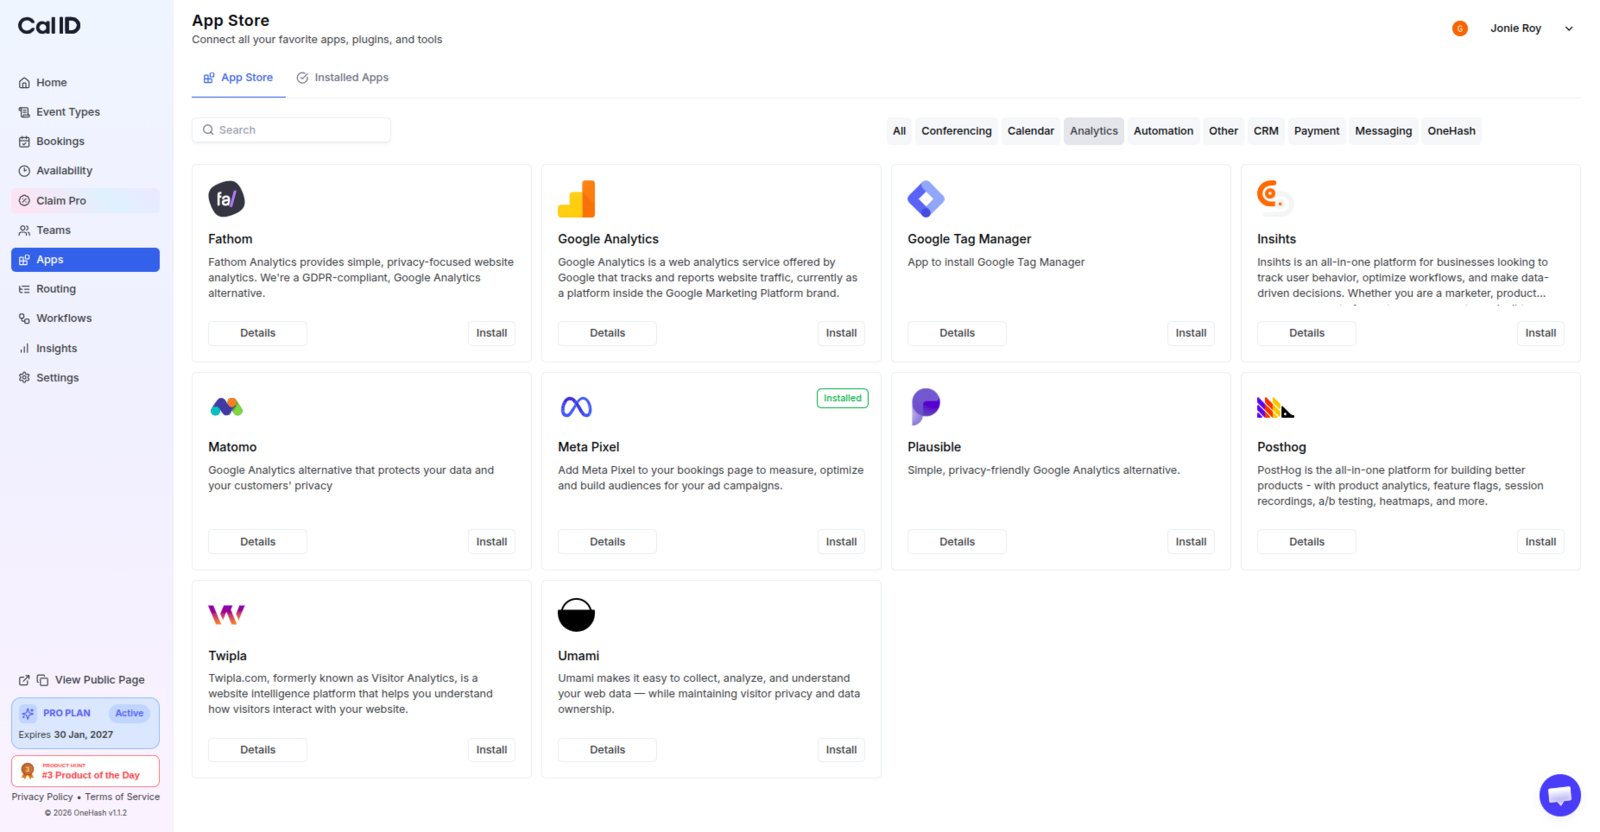
Click on [**Apps**](https://cal.id/apps) in the left-hand sidebar menu.
Choose **Analytics** from the featured categories at the top to quickly find tracking tools.
 ## Setting up Google Analytics
Google Analytics helps you understand how visitors find and interact with your booking page.
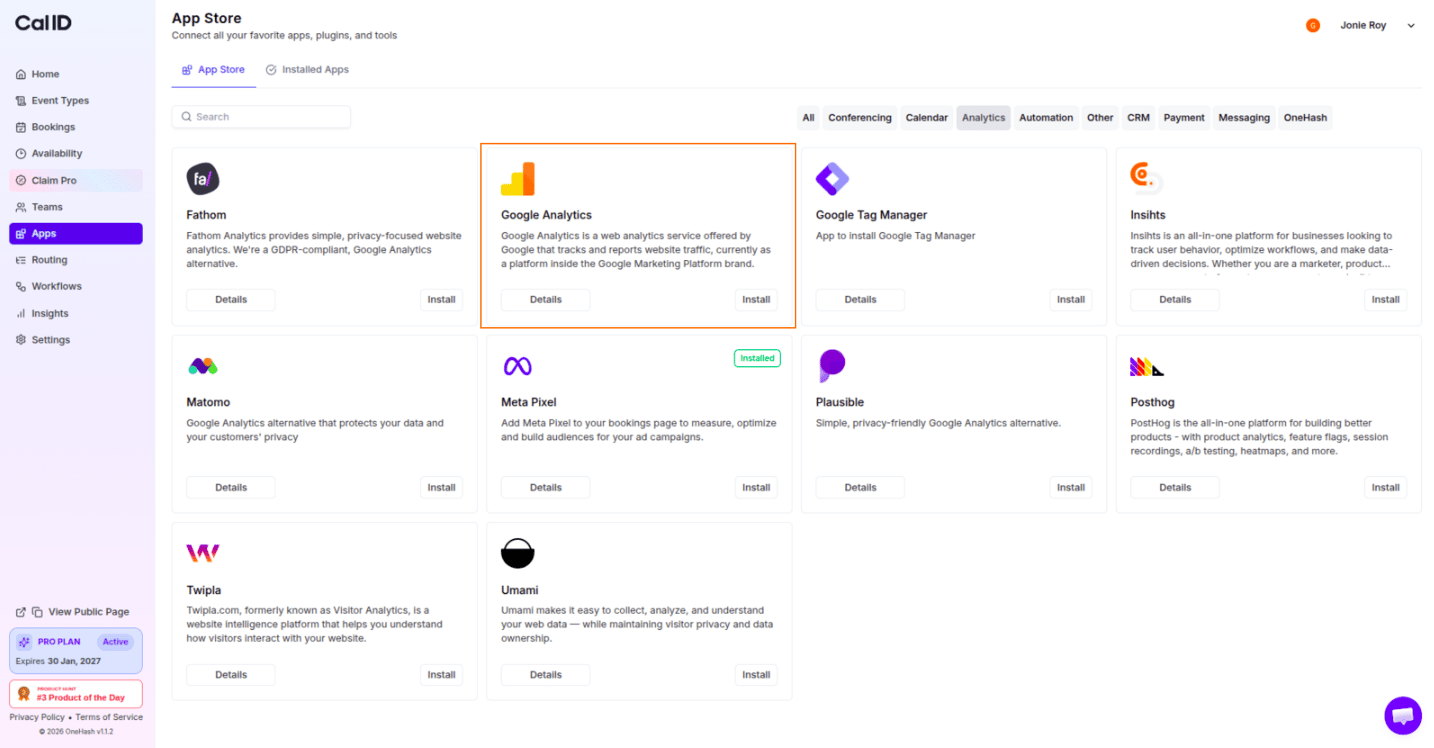
Find the **Google Analytics** card within the Analytics category and click the **Install** button on the card.
## Setting up Google Analytics
Google Analytics helps you understand how visitors find and interact with your booking page.
Find the **Google Analytics** card within the Analytics category and click the **Install** button on the card.
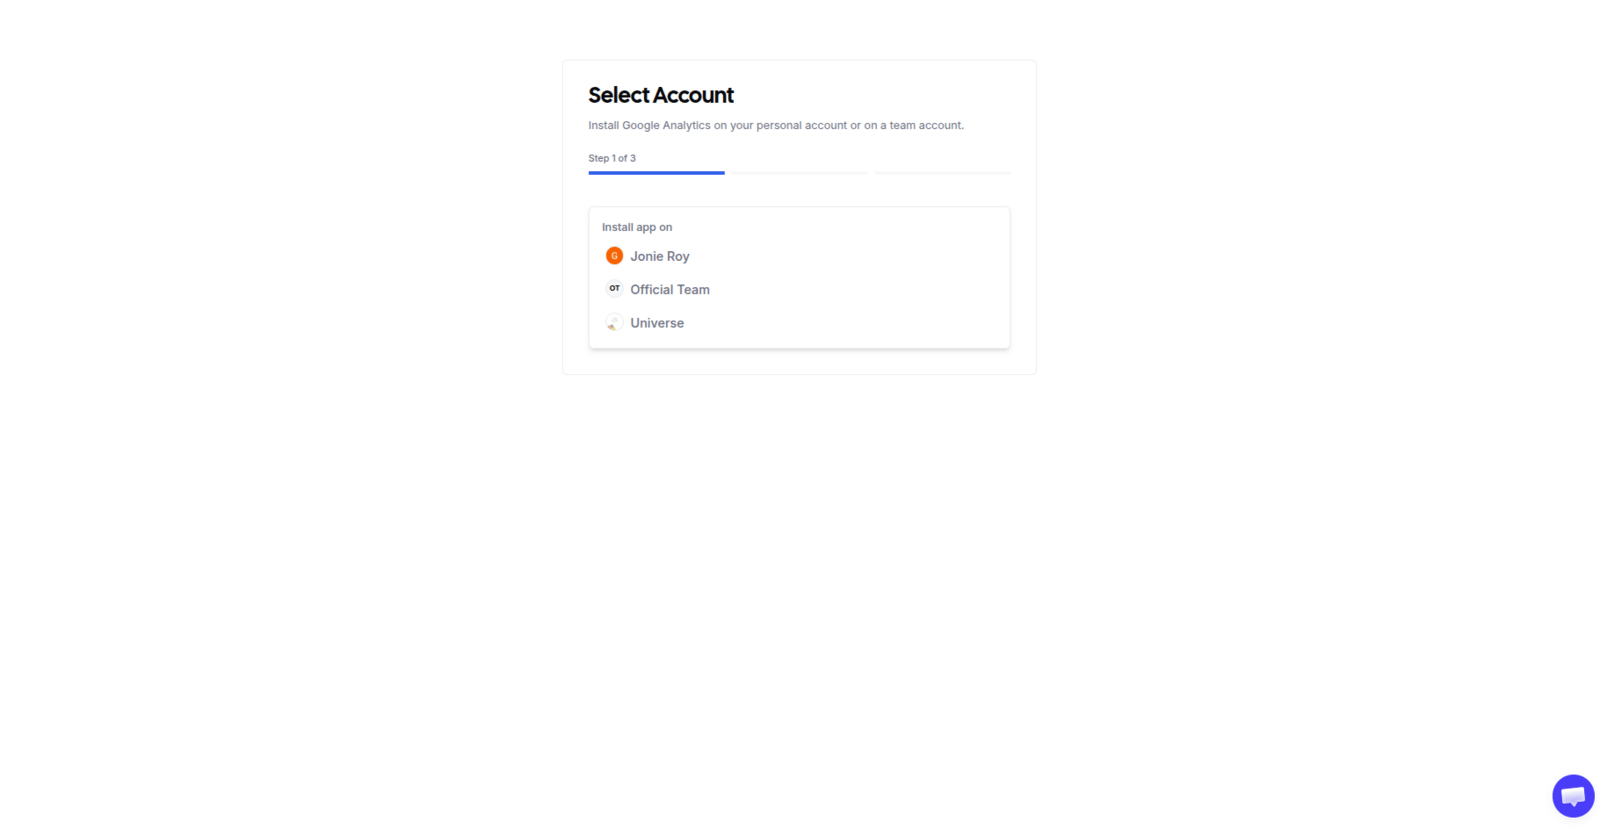
 Select the specific account where you want to install the integration.
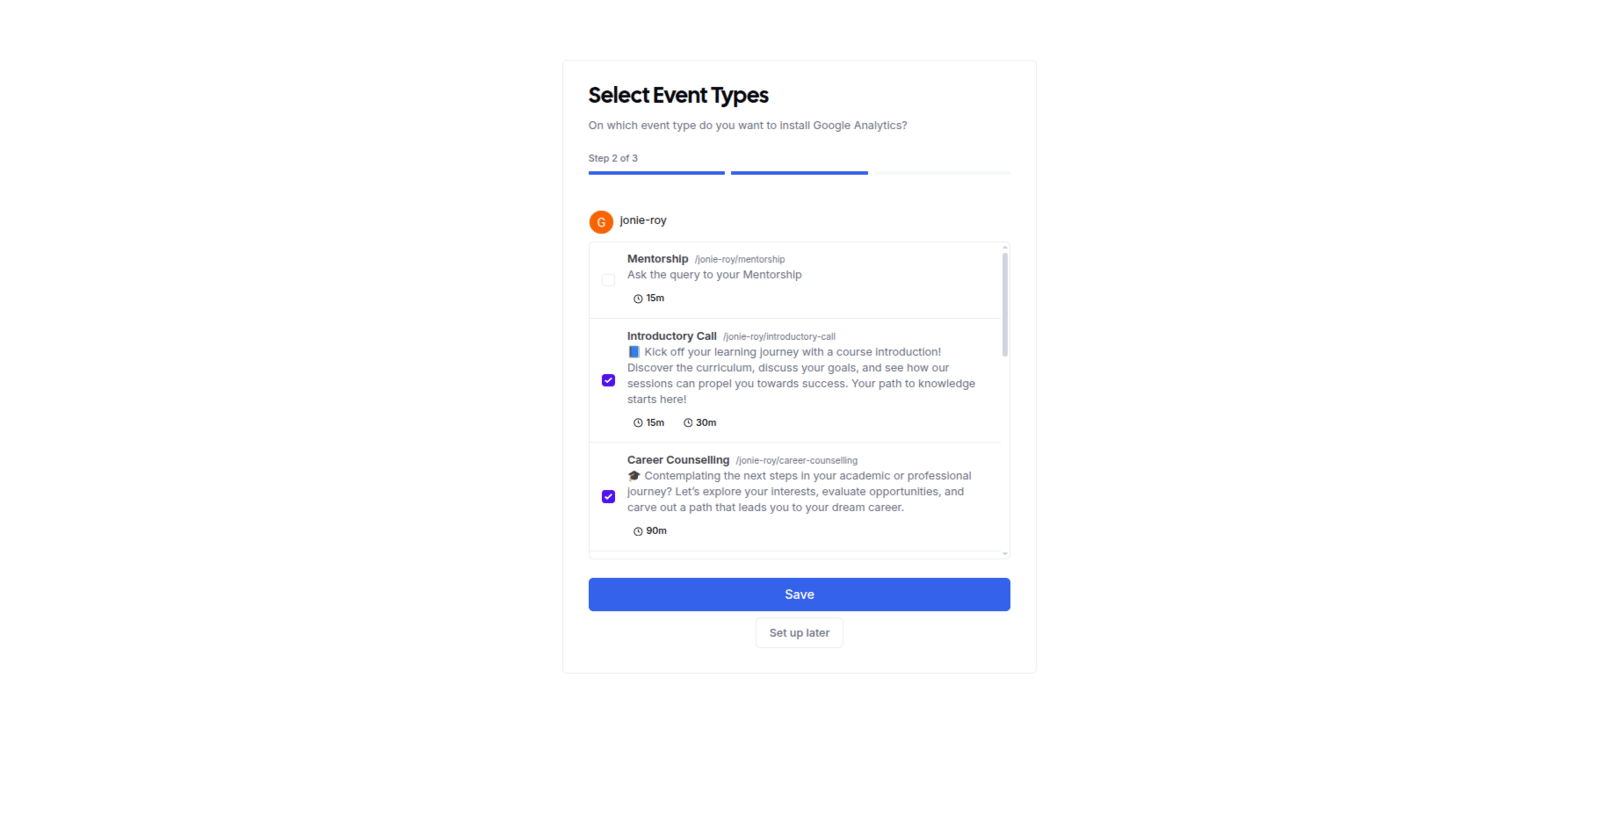
 Choose the specific **Event Types** you wish to track, or select **Set up later** if you prefer to configure this at a different time.
 If you selected event types, a pop-up will appear asking for your **Tracking ID** (formatted as `UA-XXXXXX-Y` or `G-XXXXXXX`).
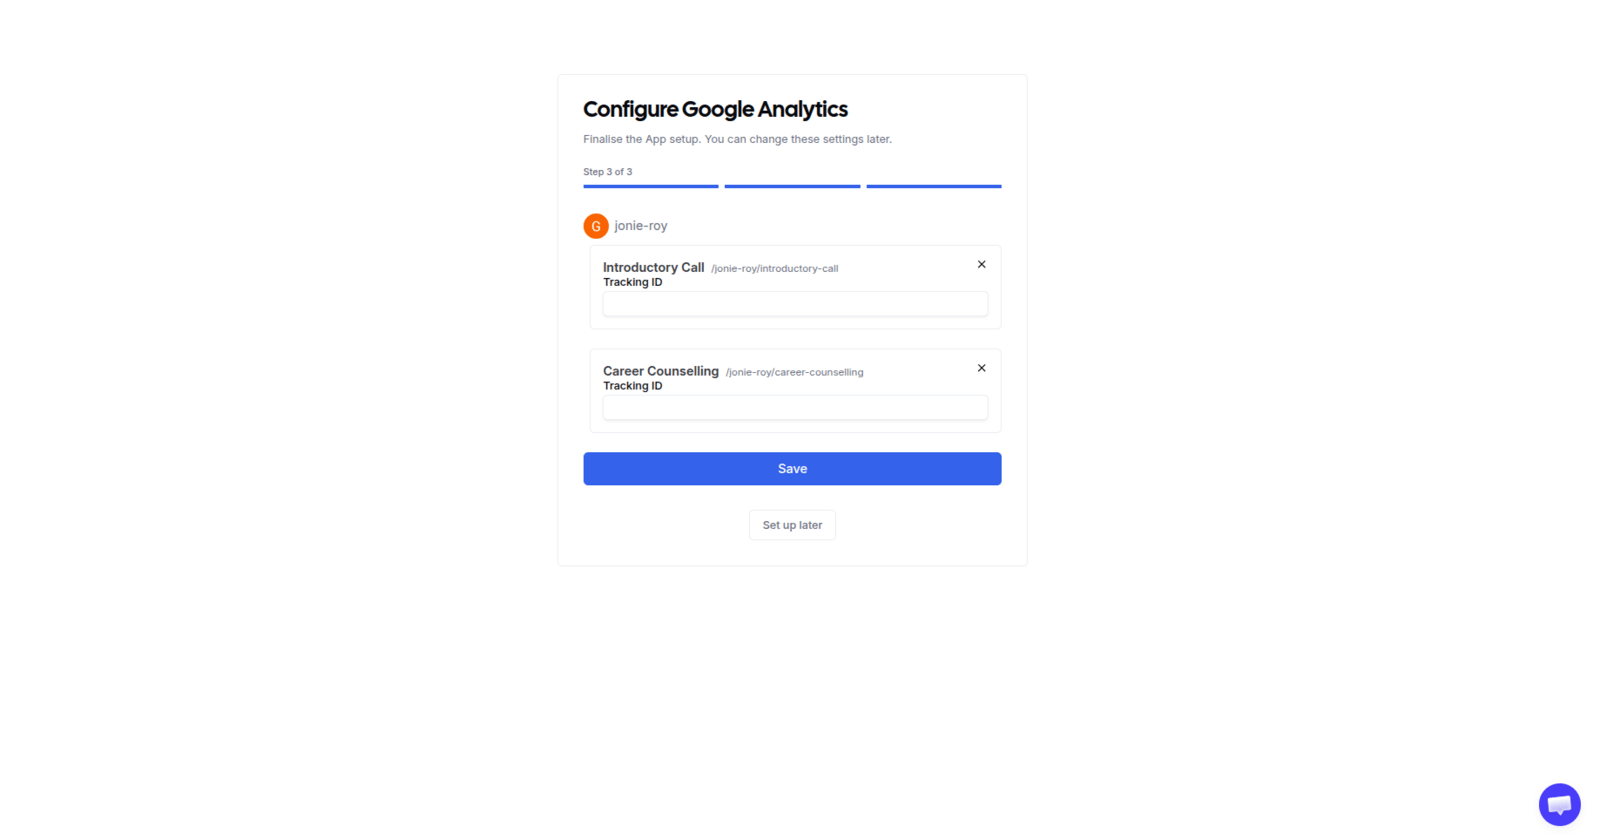 Click the **Save** button to activate tracking.
## Where to find your tracking IDs
Open your Google Analytics account.
Click **Admin** (gear icon) in the bottom left.
Click the **Save** button to activate tracking.
## Where to find your tracking IDs
Open your Google Analytics account.
Click **Admin** (gear icon) in the bottom left.
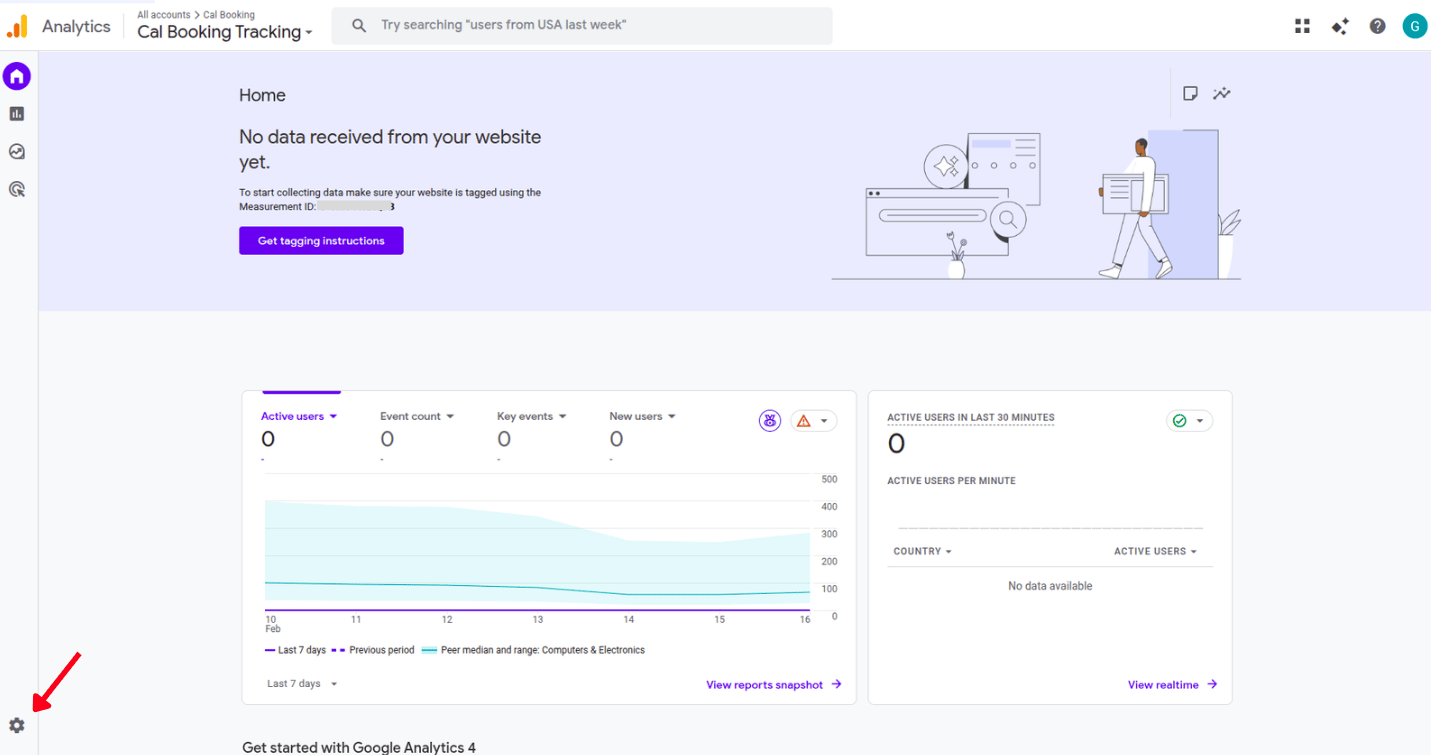 Under the Data Collection and modification column, click **Data Streams**.
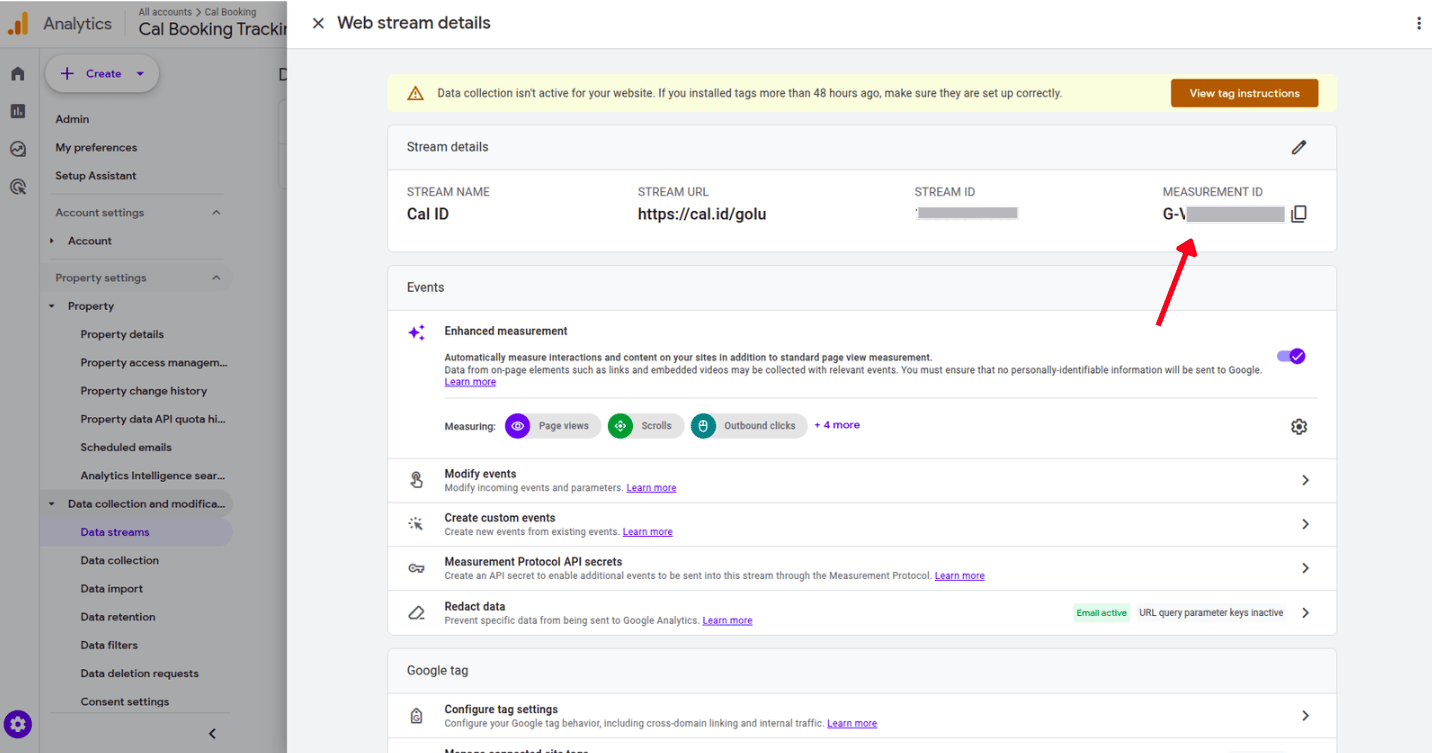
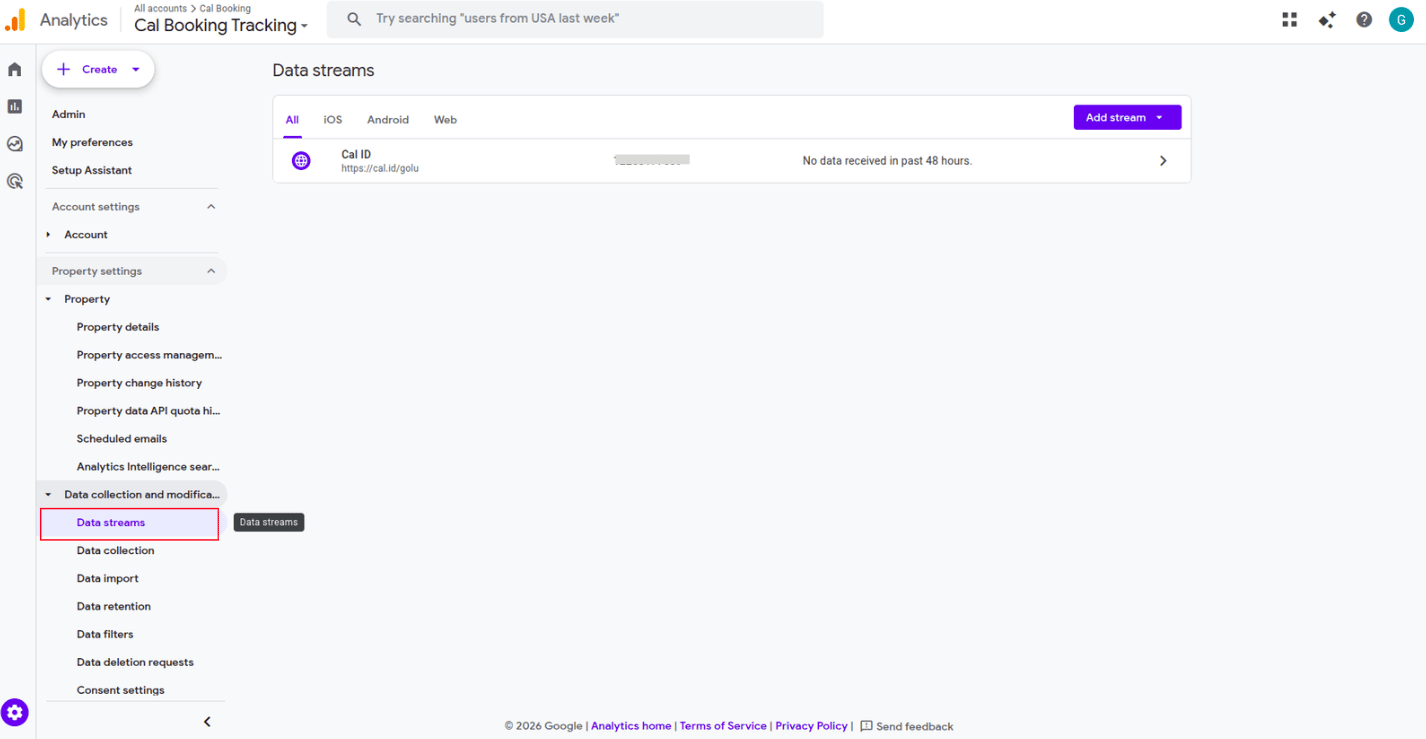 Select your website data stream and copy the Measurement ID, or if you do not see any data stream, create one.
Copy your **MEASUREMENT ID** from the top right corner and paste it in the Tracking ID field.
Select your website data stream and copy the Measurement ID, or if you do not see any data stream, create one.
Copy your **MEASUREMENT ID** from the top right corner and paste it in the Tracking ID field.
 ## What to set up in Google Analytics
To get the most out of your data, configure the following in your Google Analytics dashboard:
* **Create a Property**: Ensure you have a property created for your booking website.
* **Set up Events**: Define custom events to track specific actions, such as **Booking Form View**, **Booking Form Submission**, and **Payment Completed**.
* **Conversion Goals**: Set up goals based on these events to measure your conversion rate.
## Setting up Google Tag Manager
Google Tag Manager allows you to manage and deploy marketing tags without modifying code directly.
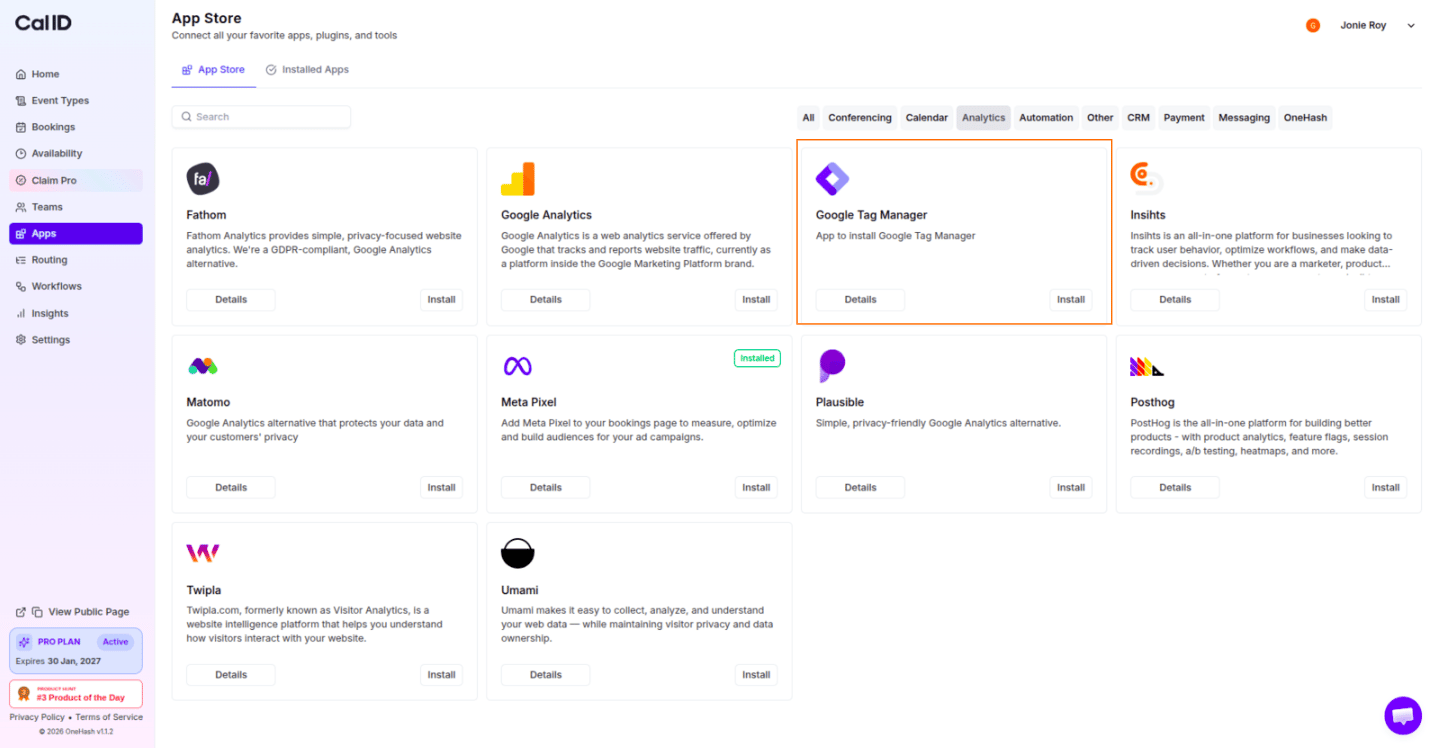
Find the **Google Tag Manager** card in the App Store and click the **Install** button.
## What to set up in Google Analytics
To get the most out of your data, configure the following in your Google Analytics dashboard:
* **Create a Property**: Ensure you have a property created for your booking website.
* **Set up Events**: Define custom events to track specific actions, such as **Booking Form View**, **Booking Form Submission**, and **Payment Completed**.
* **Conversion Goals**: Set up goals based on these events to measure your conversion rate.
## Setting up Google Tag Manager
Google Tag Manager allows you to manage and deploy marketing tags without modifying code directly.
Find the **Google Tag Manager** card in the App Store and click the **Install** button.
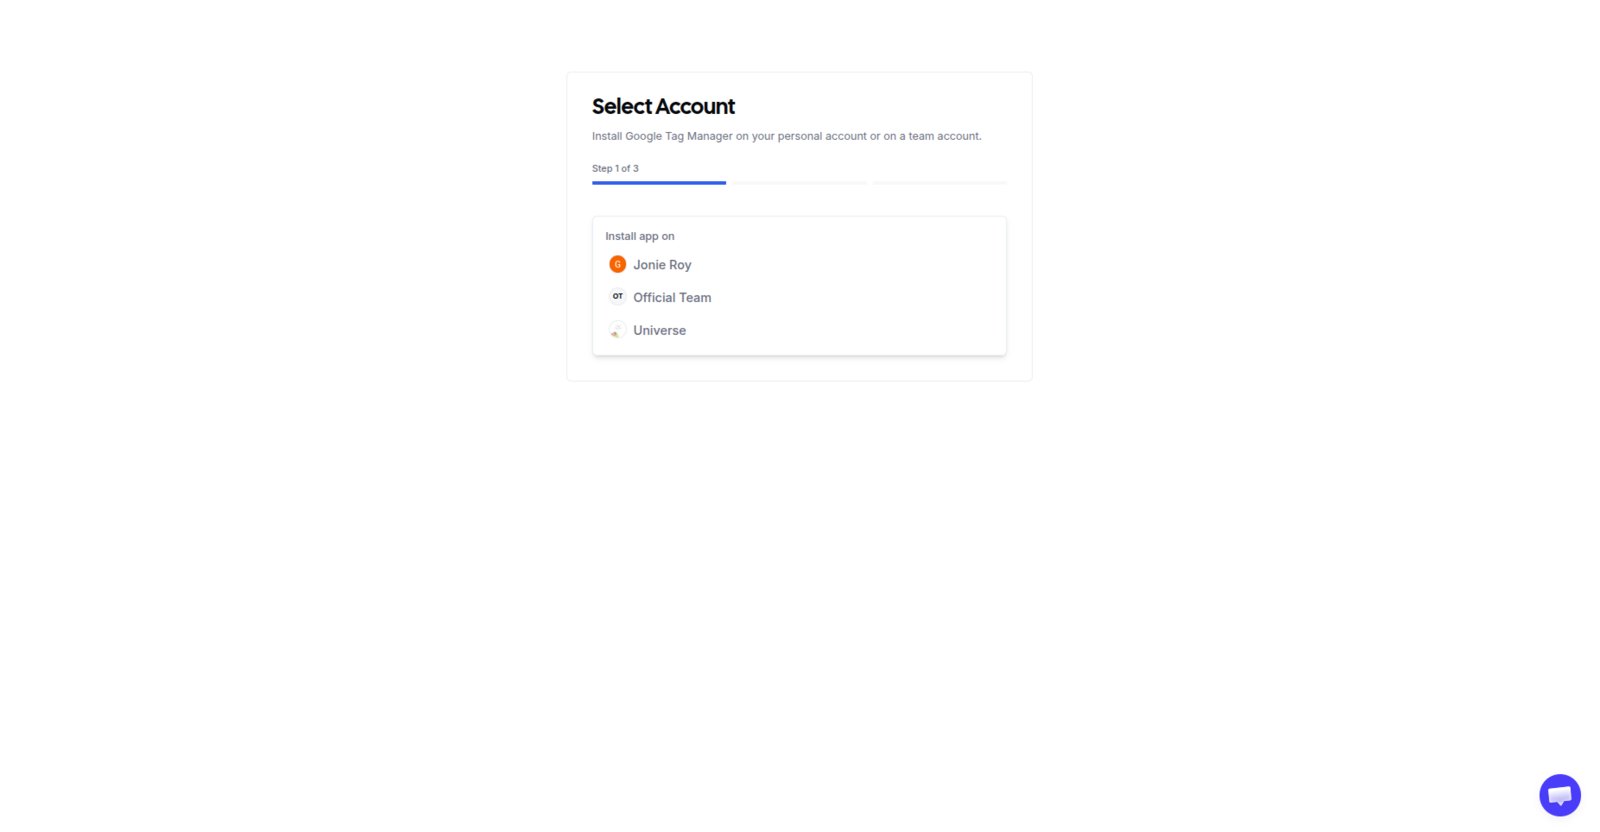
 Select your preferred account for installation.
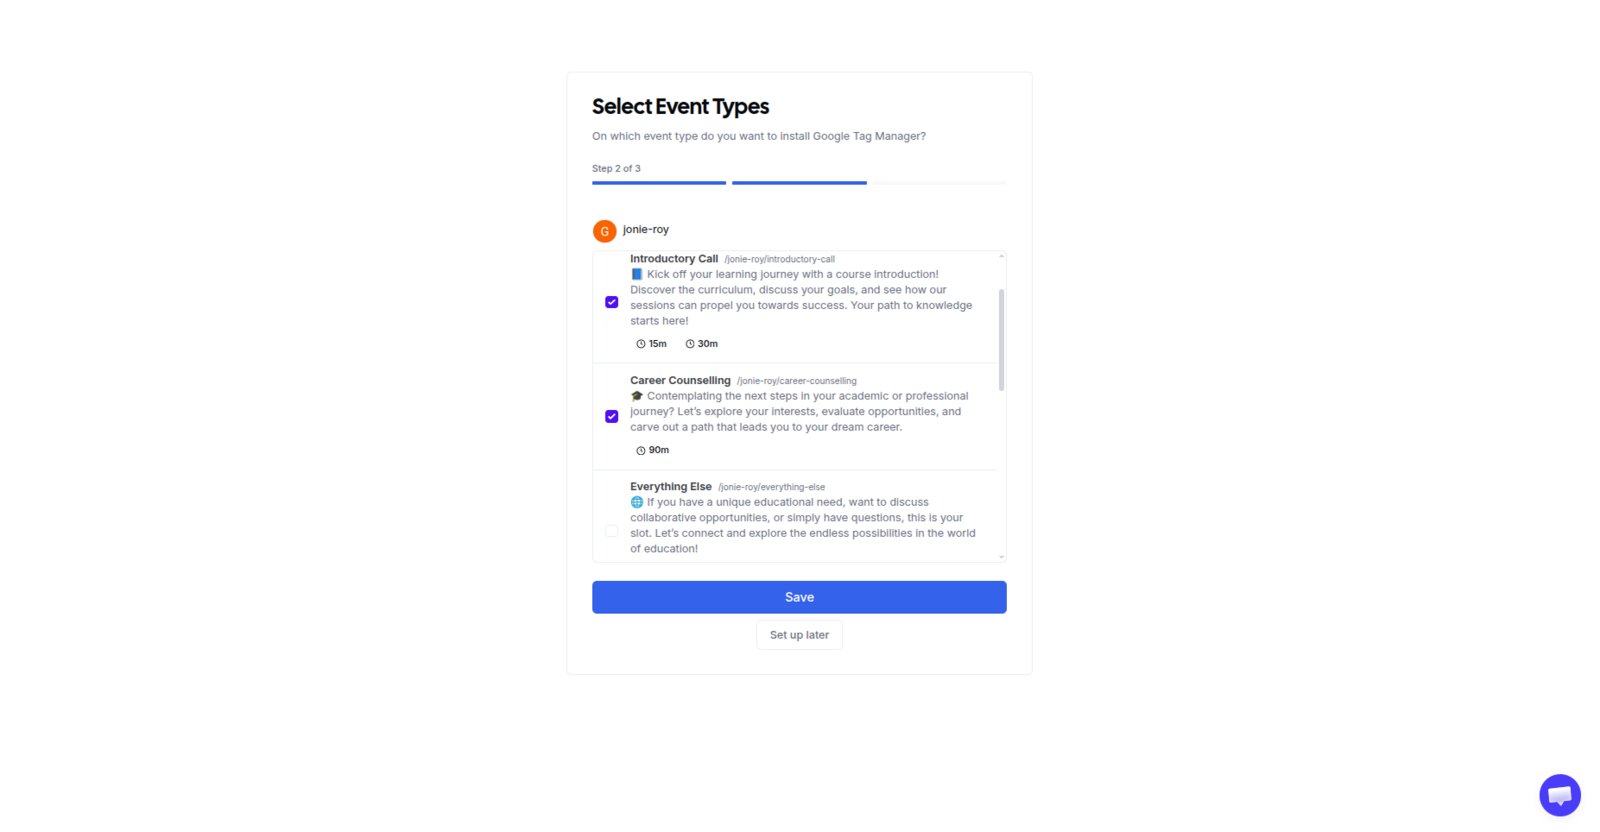
 Pick the event types to be tracked by GTM.
 Enter your **Tracking ID** (formatted as `GTM-XXXXXX`) in the pop-up field.
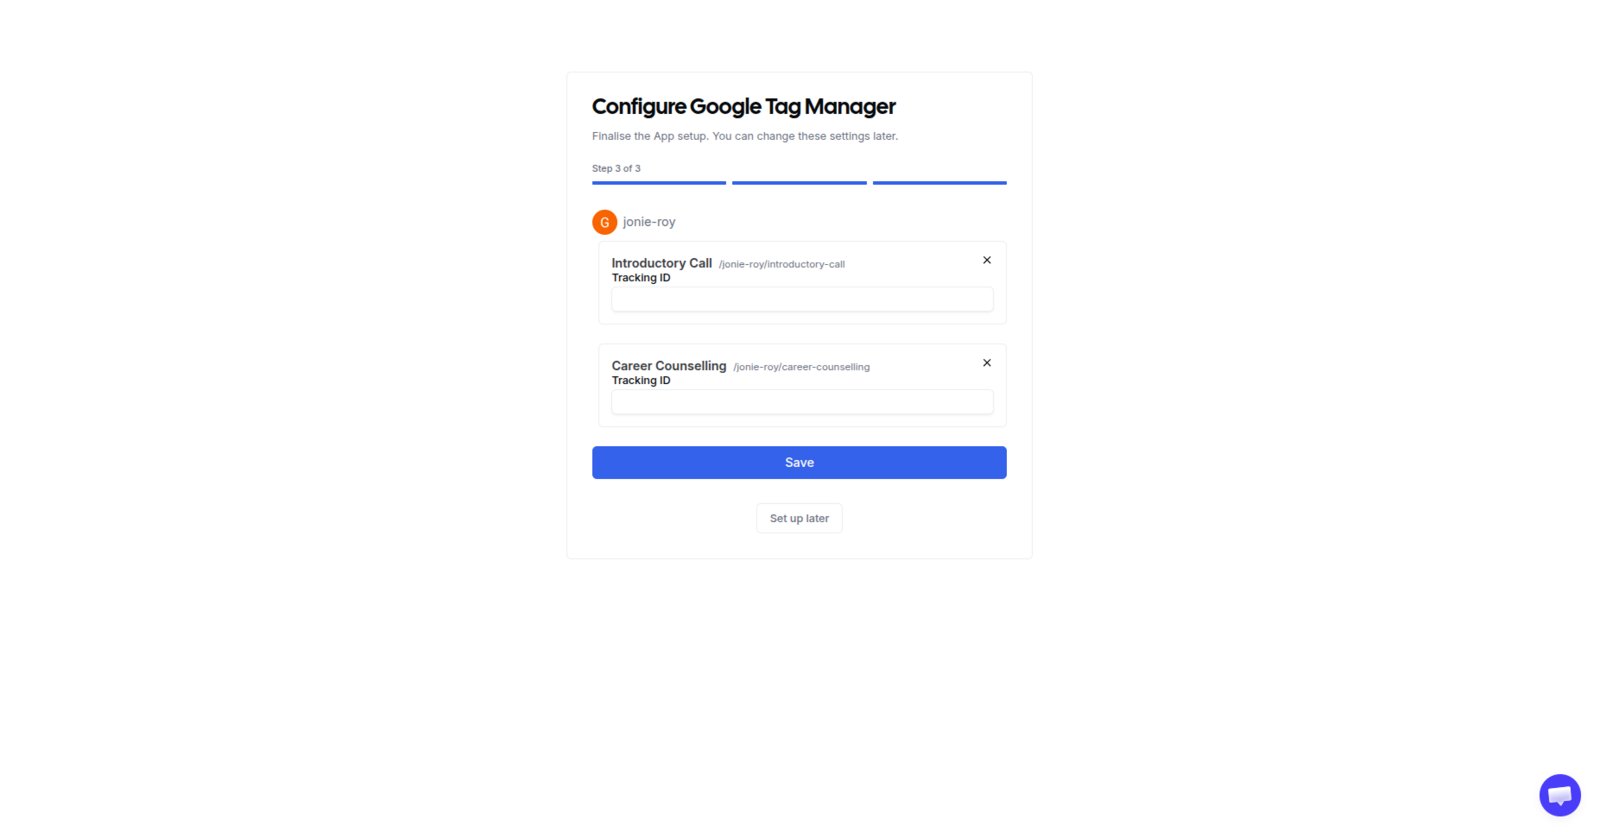 Click the **Save** button to integrate GTM.
## What to set up in Google Tag Manager
Once integrated, use GTM to manage your tracking:
* **Tags**: Create tags for Google Analytics, Facebook Pixel, or other conversion tracking tools.
* **Triggers**: Set triggers for when these tags should fire (e.g., when a user lands on the booking success page).
* **Variables**: Use built-in variables to capture specific booking data like event duration or event type name.
## Verifying installation
After installing, you can verify if the tracking is working:
* **Real-time Reports**: Check the **Real-time** report in Google Analytics to see if your own visits are being tracked.
* **Tag Assistant**: Use a browser extension like Google Tag Assistant to confirm that the GTM container is loading correctly on your public booking page.
## How to add or change IDs for a specific event
From your main dashboard, click on the [**Event Types**](https://cal.id/event-types) tab in the left-hand sidebar.
Find the specific event you want to configure and click **Edit** to open its settings.
In the top navigation bar of the event editor, click on the **Apps** tab.
Locate **Google Analytics** and/or **Google Tag Manager** in the list. Switch the toggle to **ON** for the tool you want to use for this specific event.
Click the **Save** button to integrate GTM.
## What to set up in Google Tag Manager
Once integrated, use GTM to manage your tracking:
* **Tags**: Create tags for Google Analytics, Facebook Pixel, or other conversion tracking tools.
* **Triggers**: Set triggers for when these tags should fire (e.g., when a user lands on the booking success page).
* **Variables**: Use built-in variables to capture specific booking data like event duration or event type name.
## Verifying installation
After installing, you can verify if the tracking is working:
* **Real-time Reports**: Check the **Real-time** report in Google Analytics to see if your own visits are being tracked.
* **Tag Assistant**: Use a browser extension like Google Tag Assistant to confirm that the GTM container is loading correctly on your public booking page.
## How to add or change IDs for a specific event
From your main dashboard, click on the [**Event Types**](https://cal.id/event-types) tab in the left-hand sidebar.
Find the specific event you want to configure and click **Edit** to open its settings.
In the top navigation bar of the event editor, click on the **Apps** tab.
Locate **Google Analytics** and/or **Google Tag Manager** in the list. Switch the toggle to **ON** for the tool you want to use for this specific event.
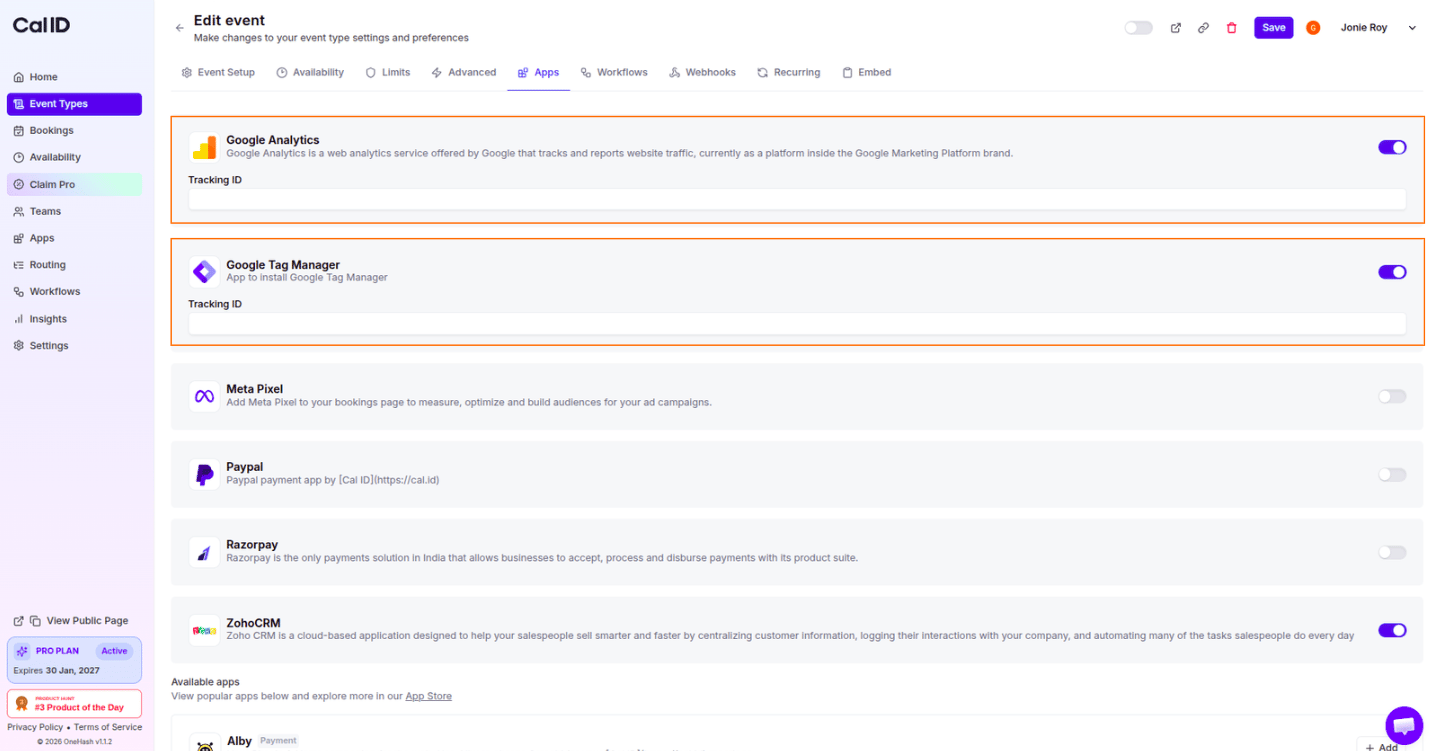 For **Google Analytics**, paste your specific `G-XXXXXXX` or `UA-XXXXXX-Y` ID into the input field. For **Google Tag Manager**, paste your specific `GTM-XXXXXX` container ID into the input field.
Click the **Save** button in the top right corner to apply these unique tracking IDs to this event type.
### Why use event-specific tracking?
* **Targeted Analytics**: Track conversions for high-value sales calls separately from general inquiries.
* **Clean Data**: Prevent data from different departments or teams from mixing in your Analytics reports.
* **Custom Triggers**: Fire specific marketing tags in GTM that only apply to certain services.
## Related topics
- [App Store](/docs/apps/app-store.md)
- [Integrating Cal ID with Make](/docs/apps/make.md)
- [Integrating Cal ID with Pabbly](/docs/apps/pabbly.md)
- [Analyzing Booking Performance with Cal ID Insights](/docs/insights/booking-performance.md)
- [Managing Installed Apps](/docs/apps/manage-installed.md)
For **Google Analytics**, paste your specific `G-XXXXXXX` or `UA-XXXXXX-Y` ID into the input field. For **Google Tag Manager**, paste your specific `GTM-XXXXXX` container ID into the input field.
Click the **Save** button in the top right corner to apply these unique tracking IDs to this event type.
### Why use event-specific tracking?
* **Targeted Analytics**: Track conversions for high-value sales calls separately from general inquiries.
* **Clean Data**: Prevent data from different departments or teams from mixing in your Analytics reports.
* **Custom Triggers**: Fire specific marketing tags in GTM that only apply to certain services.
## Related topics
- [App Store](/docs/apps/app-store.md)
- [Integrating Cal ID with Make](/docs/apps/make.md)
- [Integrating Cal ID with Pabbly](/docs/apps/pabbly.md)
- [Analyzing Booking Performance with Cal ID Insights](/docs/insights/booking-performance.md)
- [Managing Installed Apps](/docs/apps/manage-installed.md)