> ## Documentation Index
> Fetch the complete documentation index at: https://cal.id/docs/llms.txt
> Use this file to discover all available pages before exploring further.
# Booking Success URL
> Redirect guests to a custom thank-you webpage immediately after they finish scheduling a Cal ID meeting instead of the default confirmation screen.
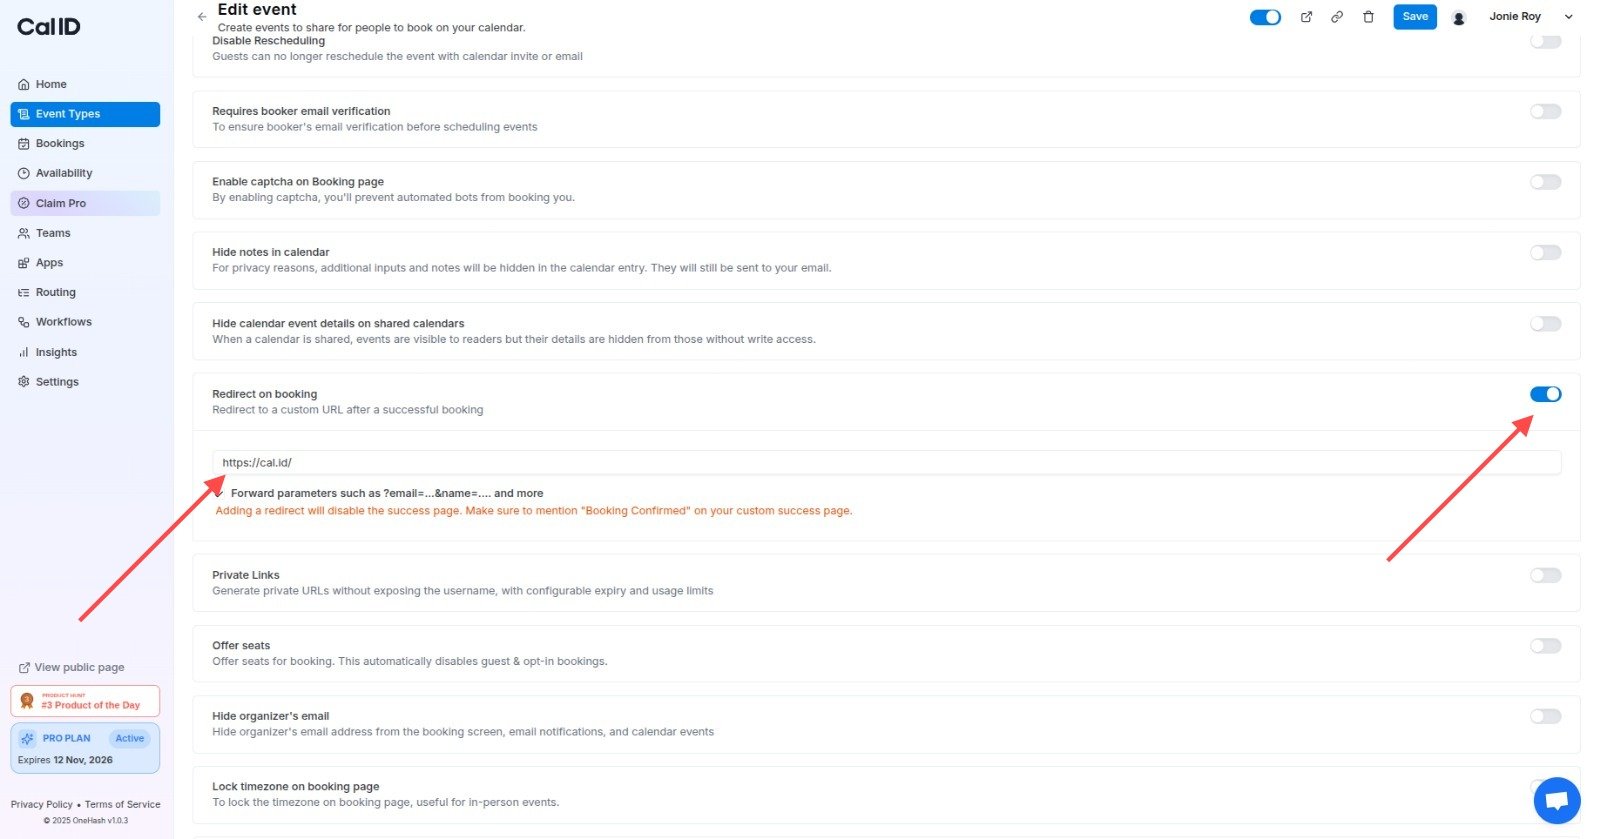
Send guests straight to a page of your choosing the moment they finish booking. In **Cal ID**, the **Redirect on booking** feature (also known as the **Booking Success URL**) bypasses the standard confirmation screen and sends guests directly to a specific webpage right after they schedule.
## Setting up a booking success redirect
This feature is ideal for moving guests further down your funnel — whether that's a "Thank You" page, a resource download, or a payment portal.
## Why use a custom success URL?
* **Track conversions:** Redirect to a specific page on your website (e.g., `/thank-you`) to easily track successful bookings in Google Analytics or Facebook Pixel.
* **Provide next steps:** Send guests to a page with a video greeting, a preparation form, or a "What to expect" guide.
* **Branding:** Keep the experience entirely within your own website domain rather than showing the Cal ID confirmation screen.
* **Offer downloads:** Automatically deliver a PDF, whitepaper, or digital asset the moment they book a session.
## How to set it up
Click on **Event Types** in the left sidebar.
Click on the specific event where you want to add the redirect.
Click on the **Advanced** tab in the top navigation bar.
Locate the section labeled **Redirect on booking**.
Paste the full destination URL into the field.
You must include the protocol (e.g., `https://www.yourwebsite.com/success`).
 Click the **Save** button at the top right.
## What the guest experiences
* The guest fills out your **Booking Questions** and clicks "Confirm".
* Instead of seeing the default "Meeting Confirmed" message from Cal ID, their browser automatically loads your custom URL.
* The transition is typically seamless, keeping the guest engaged with your brand.
## Technical tip: passing data (advanced)
Many scheduling platforms let you "forward" the guest's information (like their name or email) to your success page via the URL, so your "Thank You" page can automatically say something like **"Thanks for booking, John!"**
See every query parameter Cal ID forwards to your custom URL.
Share restricted, single-use or time-based booking links.
## Related topics
- [Booking Success Redirect Parameters](/docs/event-types/advanced/success-redirect-params.md)
- [Custom Event Name in Booking](/docs/event-types/advanced/custom-event-name.md)
- [Add Events to Calendar](/docs/event-types/advanced/add-to-calendar.md)
- [Single-Use or Time-Based Private Links](/docs/event-types/advanced/private-links.md)
Click the **Save** button at the top right.
## What the guest experiences
* The guest fills out your **Booking Questions** and clicks "Confirm".
* Instead of seeing the default "Meeting Confirmed" message from Cal ID, their browser automatically loads your custom URL.
* The transition is typically seamless, keeping the guest engaged with your brand.
## Technical tip: passing data (advanced)
Many scheduling platforms let you "forward" the guest's information (like their name or email) to your success page via the URL, so your "Thank You" page can automatically say something like **"Thanks for booking, John!"**
See every query parameter Cal ID forwards to your custom URL.
Share restricted, single-use or time-based booking links.
## Related topics
- [Booking Success Redirect Parameters](/docs/event-types/advanced/success-redirect-params.md)
- [Custom Event Name in Booking](/docs/event-types/advanced/custom-event-name.md)
- [Add Events to Calendar](/docs/event-types/advanced/add-to-calendar.md)
- [Single-Use or Time-Based Private Links](/docs/event-types/advanced/private-links.md)