> ## Documentation Index
> Fetch the complete documentation index at: https://cal.id/docs/llms.txt
> Use this file to discover all available pages before exploring further.
# Scheduling a One-Time Group Event (Webinars & GDs)
> Combine Offer Seats with availability rules in Cal ID to host a one-time webinar or group discussion where many attendees book the same time slot.
Host a webinar or Group Discussion (GD) where many people book into one shared time slot. In **Cal ID**, you combine the **Offer seats** feature with specific availability rules so a single session can hold a whole group — and no other days or times distract the booker.
## Why use this setup?
* **Host large groups**: Allow multiple guests to join a single session at once.
* **Lock in a specific time**: Ensure the event only happens when you want it to, without showing other daily availability.
* **Control attendance**: Set a maximum capacity for your webinar or discussion.
## How to set it up
A locked group event comes from three settings working together: **Offer seats** (capacity), **Limit future bookings** (the date), and a **Date Override** (the exact time). Set all three and every booking funnels into one slot.
### Enable group seating
Navigate to the **Event Types** tab in your dashboard.
Select the event you wish to use and click **Edit**.
Go to the **Advanced** tab.
Toggle **Offer seats** to **ON**.
Enter the number of participants allowed (e.g., 50 seats).
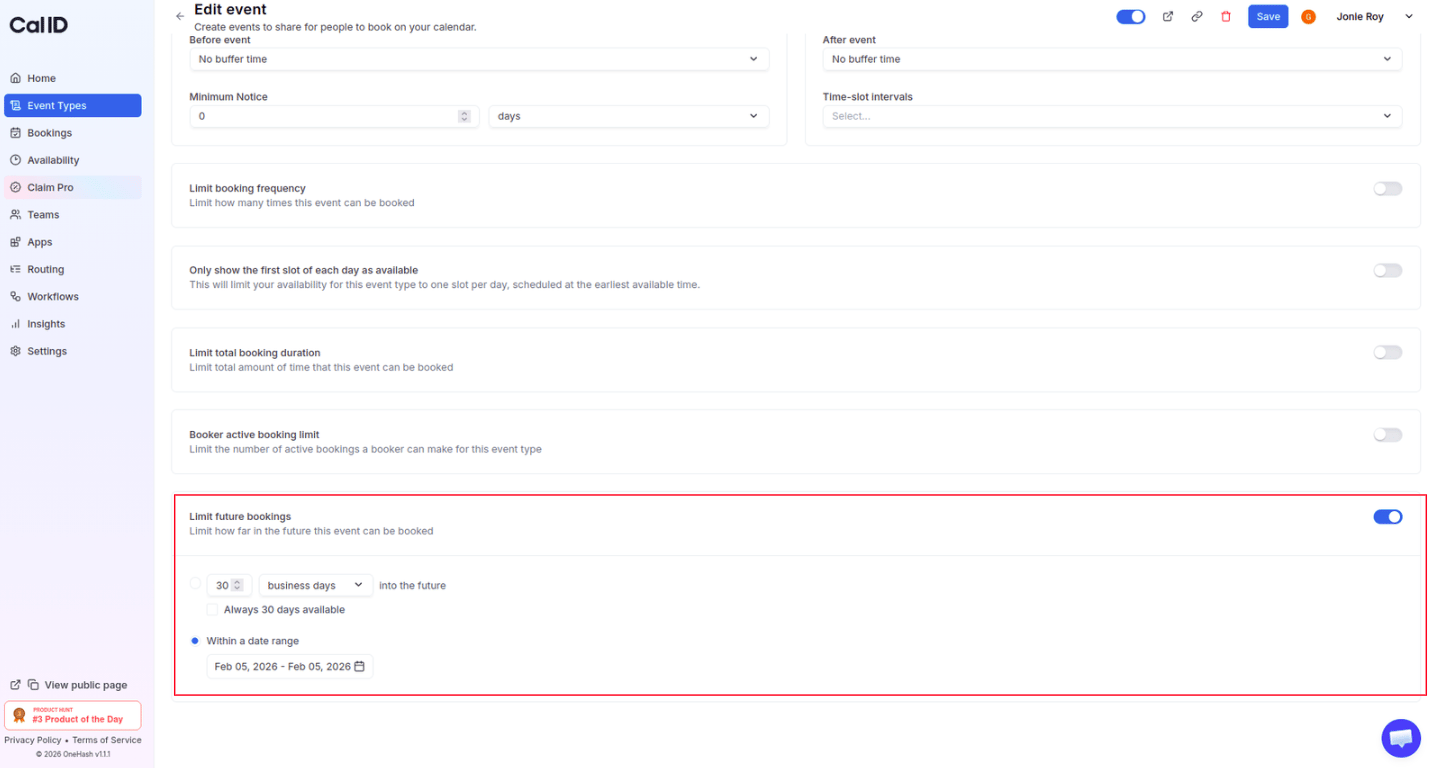
### Pick the date
In the **Limits** tab, find [**Limit future bookings**](/docs/event-types/limits/future-booking).
Choose the specific date or the date range of your event. This hides all other days on your calendar so guests only see the event day.
 ### Set the exact time slot
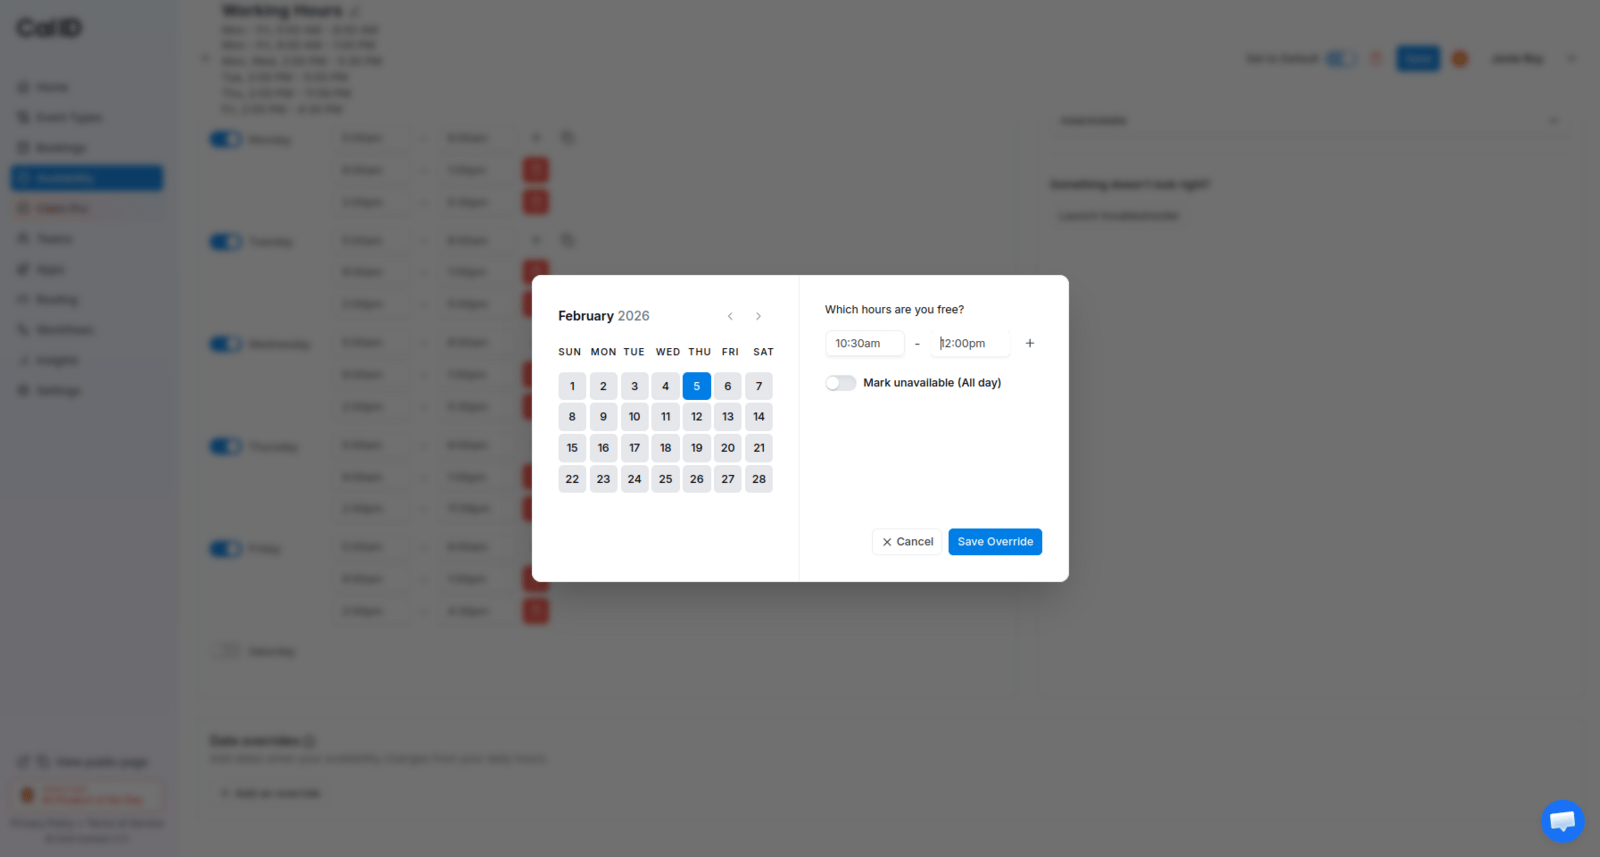
Go to the [**Availability**](/docs/event-types/setup/event-availability) tab for that specific event type and click **Edit**.
Add a [**Date Override**](/docs/availability/date-overrides) for the day of your event.
Select the date on the calendar and set your **specific start and end time** (e.g., 3:00 PM to 4:00 PM).
If you want to host multiple sessions on the same day (for example, one at 10:00 AM and another at 4:00 PM), simply set the **Date Override** accordingly by adding multiple time ranges for that date.
Click **Save**.
### Set the exact time slot
Go to the [**Availability**](/docs/event-types/setup/event-availability) tab for that specific event type and click **Edit**.
Add a [**Date Override**](/docs/availability/date-overrides) for the day of your event.
Select the date on the calendar and set your **specific start and end time** (e.g., 3:00 PM to 4:00 PM).
If you want to host multiple sessions on the same day (for example, one at 10:00 AM and another at 4:00 PM), simply set the **Date Override** accordingly by adding multiple time ranges for that date.
Click **Save**.
 ## How it works & looks for the booker
* **Limited calendar view**: When the booker opens your link, they will see most dates "greyed out". Only the specific date(s) you chose in **Limit future bookings** will be clickable.
* **Specific time slots**: After selecting the date, the booker will see only the specific time slots you created via the **Date Override** (e.g., 10:00 AM or 4:00 PM).
* **Seat availability**: The booking page may show how many seats are remaining, helping to create a sense of urgency for the event.
* **Confirmation**: Once they book, they receive a confirmation for that exact time, and the "seat count" for that slot automatically decreases by one.
## How it works & looks for the booker
* **Limited calendar view**: When the booker opens your link, they will see most dates "greyed out". Only the specific date(s) you chose in **Limit future bookings** will be clickable.
* **Specific time slots**: After selecting the date, the booker will see only the specific time slots you created via the **Date Override** (e.g., 10:00 AM or 4:00 PM).
* **Seat availability**: The booking page may show how many seats are remaining, helping to create a sense of urgency for the event.
* **Confirmation**: Once they book, they receive a confirmation for that exact time, and the "seat count" for that slot automatically decreases by one.
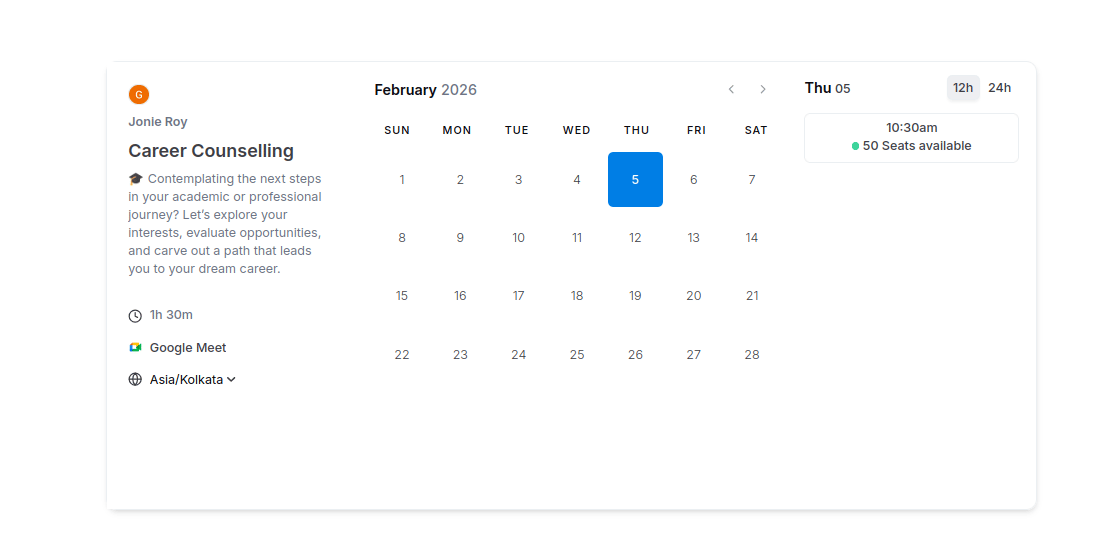 **The perfect webinar setup:** By following these steps, you create a "locked" event. Because you selected a date range in **Limit future bookings** and set a **Date Override** for the time, all available seats are forced into that one specific slot. Your event is now scheduled for a single specific date and a single specific time, making it easy for everyone to join at once!
## Next steps
Fine-tune capacity, seat visibility, and how attendees share a slot.
Turn a one-time session into a repeating series attendees can subscribe to.
## Related topics
- [Setting Up Recurring Events in Cal ID](/docs/event-types/recurring.md)
- [Embed Meeting Scheduling Link](/docs/event-types/embed.md)
- [How to use Offer Seats in Cal ID](/docs/event-types/advanced/offer-seats.md)
- [Enabling Apps for Specific Event Types](/docs/event-types/enable-apps.md)
**The perfect webinar setup:** By following these steps, you create a "locked" event. Because you selected a date range in **Limit future bookings** and set a **Date Override** for the time, all available seats are forced into that one specific slot. Your event is now scheduled for a single specific date and a single specific time, making it easy for everyone to join at once!
## Next steps
Fine-tune capacity, seat visibility, and how attendees share a slot.
Turn a one-time session into a repeating series attendees can subscribe to.
## Related topics
- [Setting Up Recurring Events in Cal ID](/docs/event-types/recurring.md)
- [Embed Meeting Scheduling Link](/docs/event-types/embed.md)
- [How to use Offer Seats in Cal ID](/docs/event-types/advanced/offer-seats.md)
- [Enabling Apps for Specific Event Types](/docs/event-types/enable-apps.md)